DIY Faux Brick Wall Tutorial
Creating a Faux Brick Wall
One of our resolutions this year is to get our home in order and actually furnish and decorate in hopes it would look and feel more like our home instead of just a house. Our house was recently updated and it’s left us impressed but feeling less inspired on how to make it more us with a little more character. One particularly challenging area was the office.
We have a very ugly couch Jacob picked up back in his single days from a much older church leader for about $20 that is straight out of the 80’s with a subtle pink stripe garnishing a brown plush exterior. It’s pretty awful by today’s standards, but it’s in amazing condition and hardly used! It was always on our to replace list in our old house but went okay with our brown kitchen and we just kept casually looking never replacing. We both agreed when we moved into our home with light-gray walls the couch wasn’t coming. You can imagine our dismay when we walked into the new office to this couch that just didn’t fit plopped right in the middle of our new home. Sigh, it’s like a trusty stray dog that we somehow keep feeding and it keeps coming back for more.
The weirdest part is we actually use this couch! We finagled it to fit in the office and it’s where I sit and work when our nanny comes, where Jacob holds a lot of church meetings, and where we throw a white sheet over it for certain pictures and YouTube recordings (*hangs head in embarrassment letting this secret out, but now you know more about this post and this post’s hidden secrets).
So, in a way, it’s been really great for us to talk about the purpose of our office and what we want/need from it. Decorating and showing its multi-use purposes is another post for another day, but let’s just say one purpose was the need for a picture background and YouTube video creation spot. I really wanted a cool wall that helped bring in a lot of bright lighting, and until I mapped out the flow and functionality of the room, I didn’t have a vision.
Brick Paneling Vision
One day sitting on that ugly couch it hit me how perfect a faux brick wall could be! There are a few things we miss about our old house, but the exposed vintage brick wall is on the top of my list. I knew a modern twist on that wall with a whitewash look would just be perfect for our home office.
I set out looking at every option I could and decided on a few techniques we would combine for our do-it-yourself faux brick wall. And best of all, this is about a half day’s project. It only takes about four hours total if you do the measuring and cutting right the first time, and use the right tools. If you have a smaller wall, it will be even faster! Oh the measuring mistakes we made that caused more time than needed!
I’ll guide you through how to avoid our mistakes and make this a breeze! And did I mention it’s about a $100-$200 total project cost project, depending on the size of your room? Our wall is rather large and we’re coming in at just under $150 total with some supplies to spare.
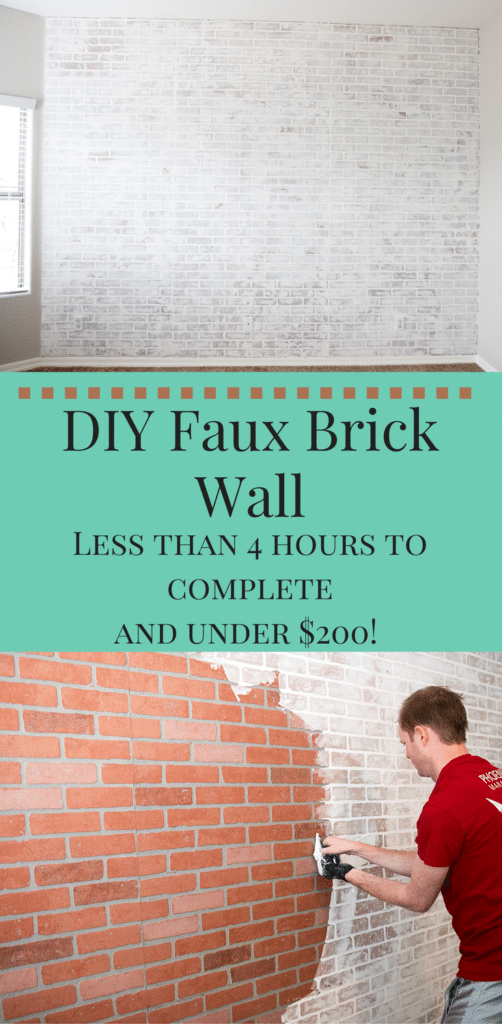
Materials for a White Faux Brick Wall
Faux Brick Panels: We went with these sheets from Home Depot. It took us four brick panels total, three to cover the wall and one more to extend to our vaulted ceilings. Measure your space carefully so you get enough!
Nails: We went basic with what we already had for this. A nail-gun would also be nice, but we didn’t have one and it wasn’t a big of deal to do it by hand.
Spackle: Get the big tub. We went through a bucket size amount and another small can. You’ll need quite a bit.
Plastic Putty Knife: A bigger one will make it go faster, but just make sure it’s plastic! We learned the hard way with metal.
White Paint: You’ll use this to seal the dried spackle, and you only need a sample size amount. It doesn’t matter what finish it is, you’re going to water it down and we found a glossy still gave the weathered look we wanted.
Sandpaper: This is optional, but if you want a less white and more distressed look you’ll need some!
How to Install Faux Brick Panels
Measure your walls and get the precise cuts you need for your wall. One tip, think about how the brick paneling will line up side by side. Think about the pattern if you have to cut a little more to reach the ceiling as well. A little planning before you make any cuts will go a long way and make the actual process so much faster!
This is where we went wrong just having cuts made and coming home realizing it wasn’t going to line up perfectly like it should. If you plan how they will line up in advance you’ll save yourself a lot of time! And pro-tip if you didn’t know, you can have Home Depot make the cuts for you. If you have your measurements in advance and plan the pattern on the spot, you can go home ready to hang up the panels and do the whole project in less than a few hours!
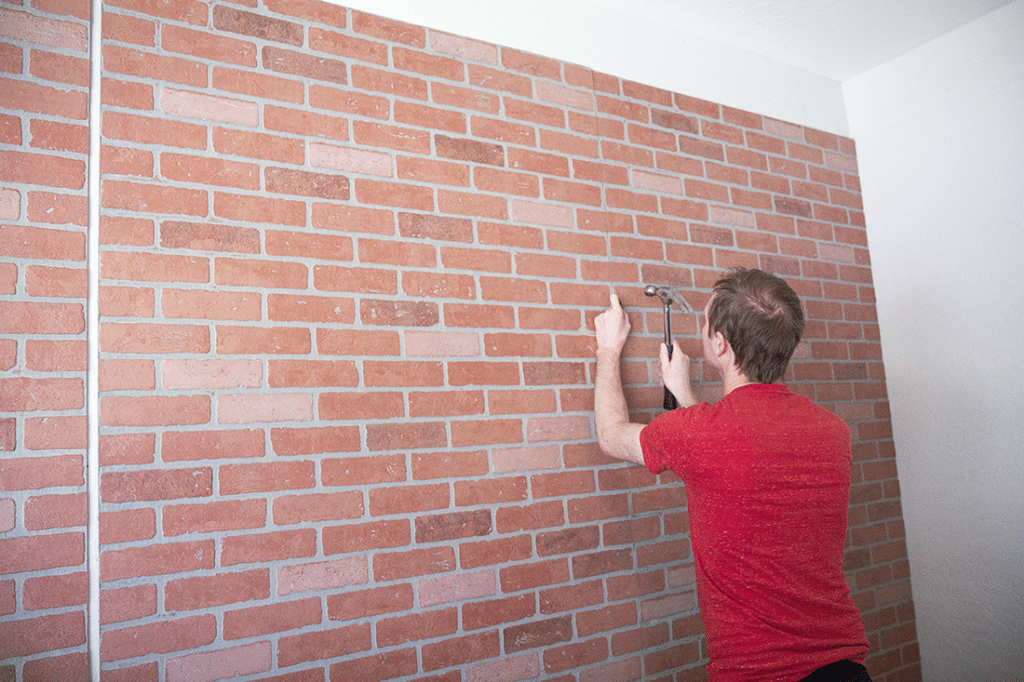
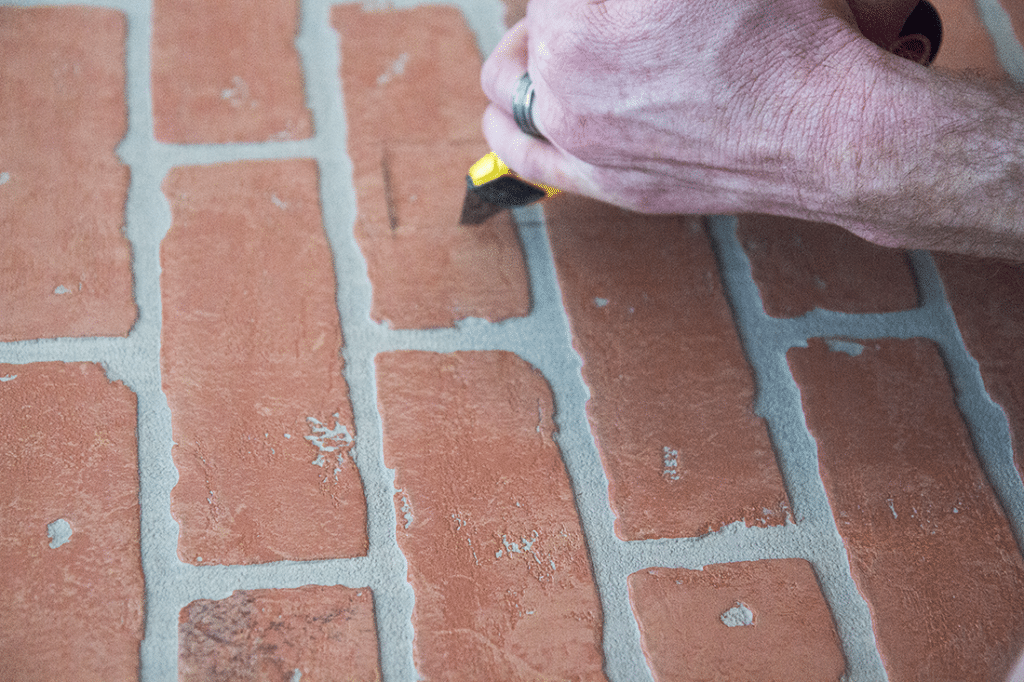
If you have any plugs of phone jacks, be sure to measure and cut a hole for those. We found an Exacto-knife worked great, and we cut ours smaller than the hole so our covers would sit on top.
How to Apply Faux Brick Wall Panels
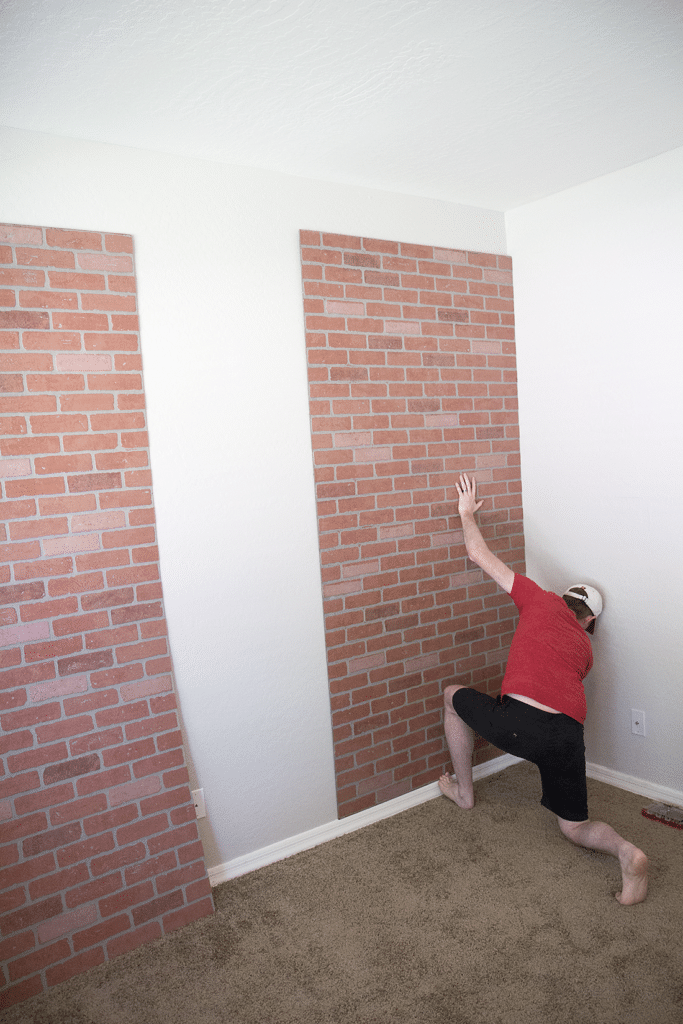
You’ll start by nailing your faux wall panels to the wall. We found it was best to find the studs and do a couple in the row of each stud. This kept things smooth and even. Match up your next panel and do the same until the entire wall is up.
How to German Smear a Faux Brick Wall
Several people are content to stop there, and if you want that color of brick then go for it! We wanted a whitewashed natural look, so we went ahead and did something called a German Smear (German Schmear). This involves applying a thick coat of spackle, primarily in the cracks. You’ll also use a putty knife to smear it along the rest of the wall.
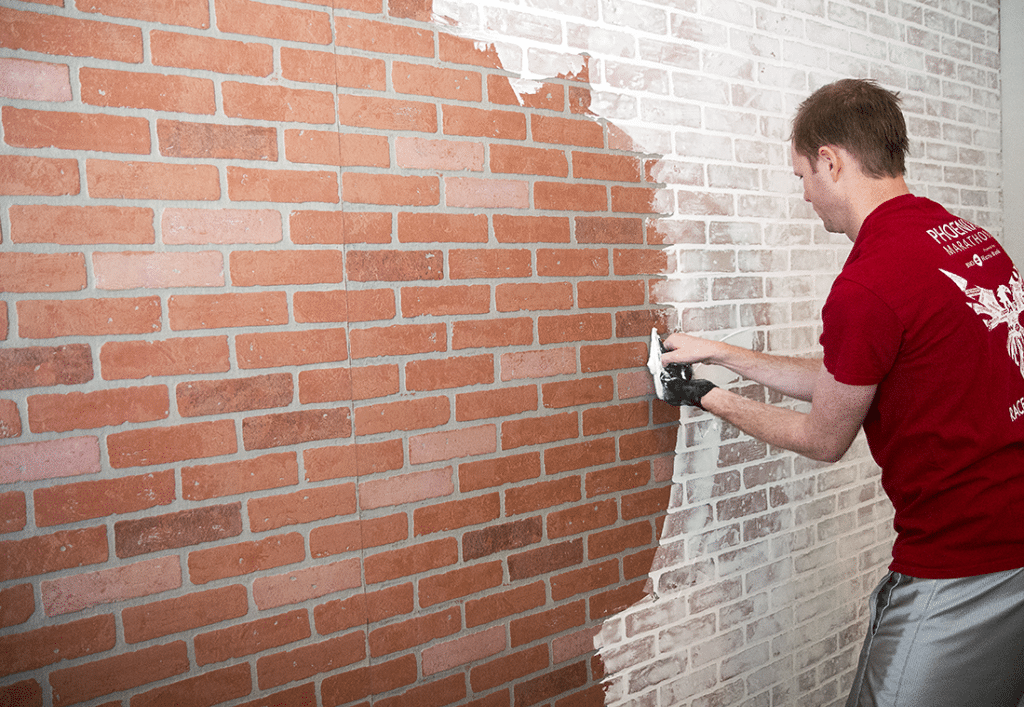
The scraping motion thins it out on the actual brick. It also applies thick coats to the grout and hides the seam of the panels well. We wanted to make this as easy as possible to explain. So, we decided to just make a quick movie tutorial. This way it’s super simple to see what I attempted to explain above.
German Smear Video Tutorial
(Video Link: https://youtu.be/XiLM0ibDFXU)
Finishing Your DIY Faux Brick Wall
After your entire wall is done let it dry. We decided overnight was best, but if you think it’s drying more quickly for you I’m sure you could tackle it sooner. When it’s dry you can decide to either finish it from there if you’re happy with the heavier white look, or you can get sandpaper and smooth any rough edges and distress a few areas to expose more of the red brick color.
We liked the distressed look, and we knew the top coat would add more white to the wall as well, so I spent about an hour sanding out certain areas and trying to fix a few spots we’d used a metal putty knife on by accident. I’m glad I did it, but I would have loved it a deeper white too. It really is your personal preference! Wipe down any excess debris from sanding if you choose to do so before you move onto the last step. I actually vacuumed the wall with a brush attachment because I’m OCD like that.
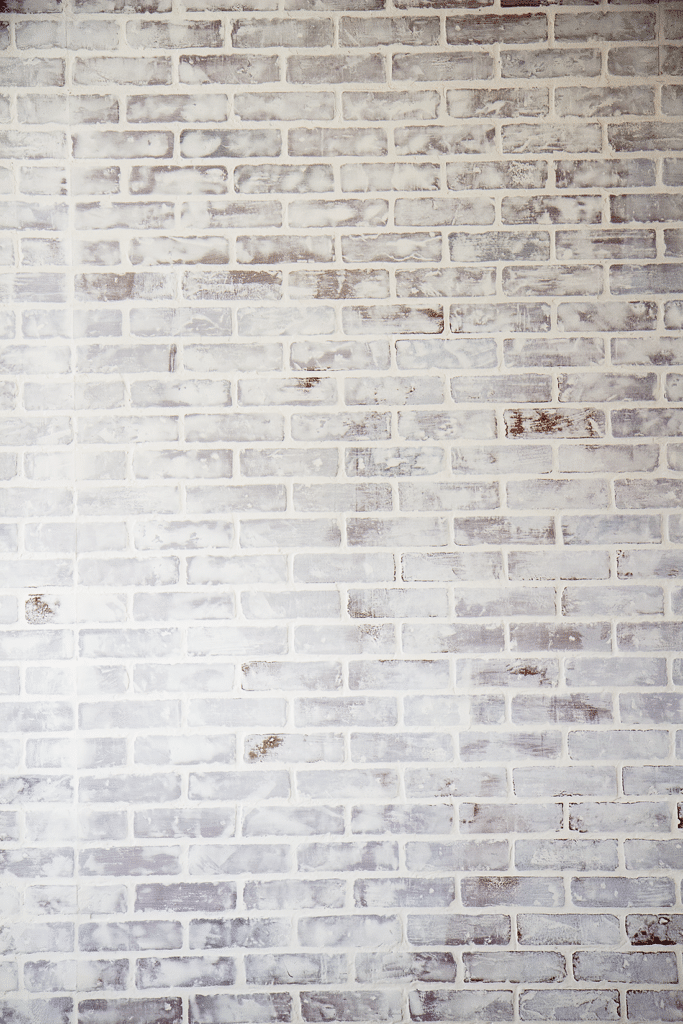
The spackle leaves a chalky texture that will transfer if you rub against it. It definitely makes a mess when little hands try to play with it, so you’ll want to seal the final wall. We did a white paint/water mixture. Because we didn’t want to add too much more white we went with 25% paint to 75% water blend. Just go slowly and put on a thin layer so you don’t let the water run and make strange lines.
If your wall could use a little more white, go for a 50/50 blend. You could also try a clear coat on top. We actually used a glossy finish because it’s what we had on hand. I was a little worried it would ruin the look. But I was pleasantly surprised! We were fine with the water mixture so I don’t think it matters much what you seal it with.
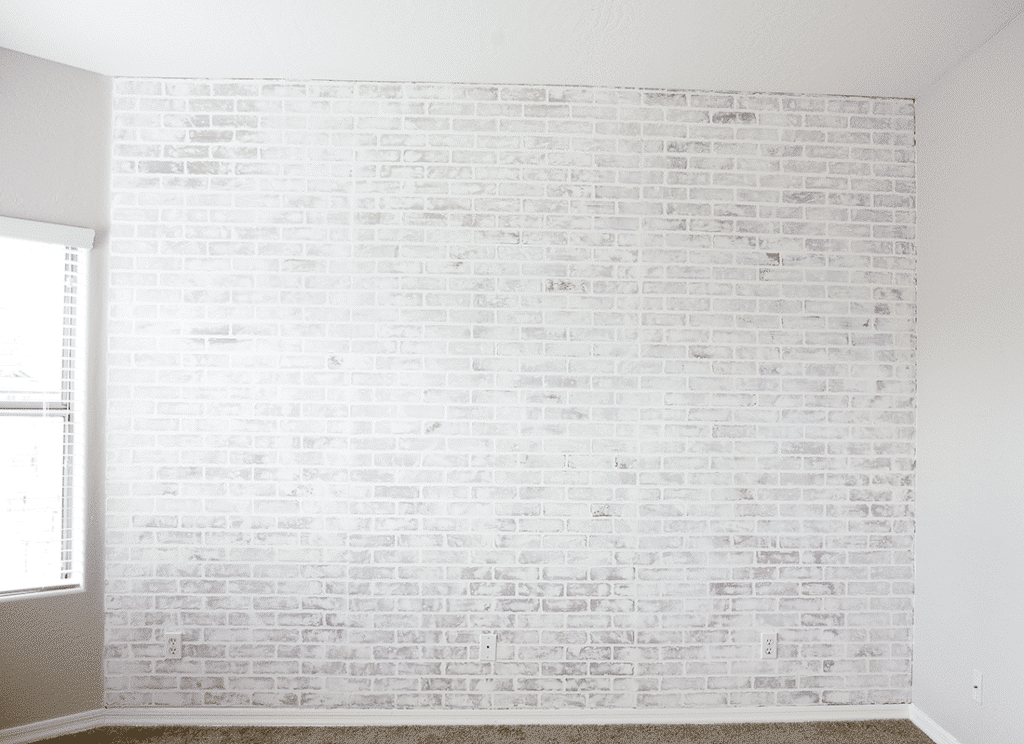
Finalizing your White Faux Brick Wall
Once it’s applied you have three options. First, you can enjoy your work if you’re happy with the look. Second, you can wait for it to dry and sand some more if needed for a more minimal look. Lastly, you can add another sealant coat if it’s still a little chalky. I did do a bit more distressing with ours, and I didn’t do another top coat.
We let it dry for about a day before we called it 100% finished.
And voila, a really big impact for a quick, cheap, classic statement wall that gives a modern twist to any room! We love it so much, and so far it’s already been very enjoyed for several pictures, and even a YouTube video filming without any sheets involved!
Like this Faux Brick Wall tutorial? You may like these posts too:
Front Door Makeover: DIY Spring Porch Refresh
Easy Way to Get Your Home Ready for Spring


Don’t do this!! We had a contractor do it for us.. it looked great for about 6 months, but then it started to bulge and the panels broke apart. Assuming it’s from temperature change (I live in NYC).
I’m so sorry that happened to you! We’ve had it up for about 6 years and we’ve only had a tiny bit of spakle crack. It’s held up really well!
I am going to try to talk My husband into doing this. I love it!! So, the link to the brick panels doesn’t work. Do you remember what the name was?
Hey Lisa, thanks for letting me know! I found the product and updated the link, so it should work now!
It’s held up so well for us for five years now! It’s definitely a great project to do- hopefully your husband jumps on board 😉
We are getting ready to do this for a second time in our laundry room. I had decided to just use paint for fear that the spackle would yellow from the heat of the dryer but now I’m thinking about doing it anyway and hoping for the best because I like the textured look of the spackle. When we did this before the spackle turned a peach-isn color and it was not really the look I had in mind. I thought it might have been the spackle we chose. In your video you used a blue bucket of DAP and it is going on white, but the link is to a purple colored bucket of spackle that goes on pink. Please advise me on the best choice and what did you use on the wall that you did? Thank you
Hey Kelly! Great question! This bucket goes on purple and dries white. It’s just an effect to help you see when the spackle is fully dry.
We’ve had it for about 5 years now and it’s still very white in our office.
Hi!
So we are doing this right now and our walls are 1-3/4” too long!! What do you recommend? We thought about nailing from the top and adding some mounding at the bottom but do you think sparkling could cover that? Or should we add mounding to the top?
Thanks,
Janelle
Hi Janelle,
How fun! I’m glad you’re doing it!
Okay a few thoughts: I would probably do a trim up top if it fit the room. But I just asked Jacob who installed and he thinks you could probably get it up to the top, and cover the bottom with enough spackle to hide it. That may be the easy way to go!
Hi!
I’m wondering about the final coat of paint—do you think a very pale gray would work as well as white? So excited to see this and follow you! The wall looks amazing!
I wish I could give you an exact amount. It will vary by store, location, and brand you use.
Hi there! My husband and I are doing this in our house starting tomorrow! We are so excited for the finished product! I see that you said you just need a sample size of the white paint, but what kind of paint do you recommend? I didn’t know if it should be water based or something else. Thanks so much!
Hi Ally!
So we actually didn’t use paint, we used white spackle. I would bring in a board to the paint store and ask for their recommendation for the material. And I’d love to hear what it is if anyone else has the same question!
Best of luck1
Hi there! I am so happy I found your blog- I have been searching for 9 months for a local masonry place or contractors who can do this for me. Maybe I should try it myself after reading your blog. You stressed the importance of lining the patterns up in advance and that is the only thing that worries me. Did you line all panels up at Home Depot? And how did you figure out where they should cut to line the pattern up? I’m confused on this part! Any suggestions are much appreciated!!
And your wall came out perfect!
Thanks, years later it’s stil one of our favorite projects! And don’t stress! The good news is the panels are designed to line up! You just have to double-check you’re putting the right sides together. Like if one is upside down from the other, they won’t match. But if you double-check really quickly, you’ll be in good shape. But the honestly make it really easy, and it’s less stressful than I made it sound!
I just have to tell you how much I love you right now!! I have never commented on someone’s blog post before, but I just had to for this one. I have been looking high and low for a way to do this to my walls. Haven’t been able to find anything for months and months! Then by change I happened to come across this post! This is affordable, easy enough and absolutely PERFECT!! Thank you for this!
I am so glad you took the time to leave a comment, and that you found this! It really is so easy and affordable! I hope you love it! Let me know when you finish your wall, I’d love to have you send me a picture!
Hey! Love the look! Question about the spackle- we used the same spackle to fix some holes in our home, but we found the spackle was quite thick and not the easiest to smooth over. Is there a certain type of spackle that’s softer and easier to spread? You used the one with the dry indicator, so when your first put it in it was pink? Just want to make sure I use the rick spackle for the effect!
Hey, great questions! I think it gets thicker as it gets older/dries. I’d get a fresh tub for sure, and don’t be afraid to return if it’s too thick and seems like it’s sat on the shelf for too long. I also think it takes a little more muscle work to scrape, but it shouldn’t be too thick or too difficult.
We did use the pink kind, I was a bit worried to watch pink go on the wall, but it helped us make sure it was smooth.
I hope that helps! And I can’t wait to see your wall!
So I see the panels aren’t tall enough to cover the height of your wall, which will be the same with mine. Did you just cut another panel to fit into that space up top? And if so, does it matter where you cut, meaning for the pattern does it need to be cut so that the pattern isn’t noticeably different? Thanks.
We did need to cut another panel, and we tried to carefully choose what would line up to match the pattern. The good news is the spackle makes it feel seamless, so if you match it up close enough, it will hide anything not 100% perfect!
Hi! Love this faux brick wall. How well has the wall held up? Did the color turn yellow? How easy is it to clean?
Thanks in advance for your help.
Hey great questions! We’re 2.5 years into it and it’s stayed white without yellowing- hooray!
I’ve spot cleaned with a damp cloth only, and it’s also done well.
The only thing I’ve noticed is a few areas have had a little bit of cracking at the seams between the boards. It doesn’t ruin the look since it’s a vintage style, but it does add a few noticeable lines here and there.
I hope that helps!
Could you do all the white painting and smearing before you put the panel on the wall?
I will probably never be able to find this again I am just not good at this computer stuff could you maybe send your answer to my email address I don’t want to be a pain but I would really appreciate that , [email protected]
How did you handle the molding at the bottom of the wall? Also what about the top? Wanting to do this for my daughters room, but I’m just not sure about the molding situation……????
Great question! We didn’t have any up top, but for the bottom, we just aligned the paneling on top (above) the molding. Trim to fit what’s already there. Also, the whitewash really helps hide imperfections, so if you’re really close, the spackle will cover you!
Did you use a roller for the paint or hand brush? Thanks!
We used a roller. It was fast and easy!
How would you finish the edge it it was on a wall with an outside edge.
The spackle should allow you smooth the edges to your liking! That’s how I’d do it, just an angle to blend it in.
just wondering why the spackle coat was needed? couldn’t you just paint the panels as they were?
I love the final result, looks great!
It needs the texture pulled in for this specific look, and it helps hide the panel lines. You probably could just paint, but for the Geman smear effect spackle is a must!
Great Job!
So simple and i will try out & get back to you with images
Hi!
I tried the faux brick wall in a bedroom and after the spackling dried, it turned slightly pink. Did yours? Do you think the top coat will eliminate that?
Thanks!
We had the problem with the spackling turning pink when we used a metal drywall knife (spatula). When we switched to plastic, it didn’t seem to scrape off any red pigmentation. I don’t know if the white-wash will cover of the pink, but I doubt it would hurt. Good luck!
This looks great! Well done! #TwinklyTuesday
Love it, it gives such a contemporty feel to the space #TwinklyTuesday
Thank you! It’s been so fun to have in our home!
Is this where the new famous blue couch goes??? Or does it have another home?? This is so much fun! I love it!
That’s another room! We’re actually doing a lot our house right now and it’s been so fun!
Definitely going to try this!
It’s such an easy way to update a space!